3d Printed Nikon D3100 Case – Bringing Back Vintage Appeal
Modern technology merges with timeless design. A remarkable project revives classic aesthetics. This custom 3D printed Nikon D3100 case transforms your modern camera. It evokes classic press reporter style. This unique shell makes your camera look truly old. It captures an essence of past eras. Every detail contributes to this perfect illusion. Experience true vintage appeal.
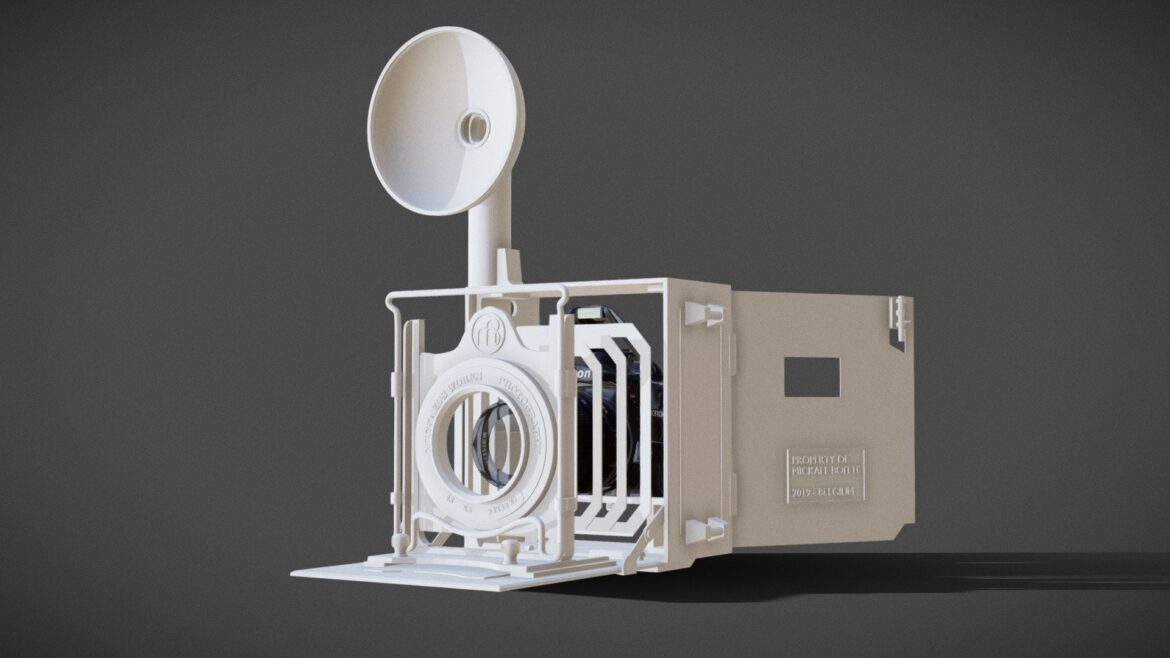
3d Printed Nikon D3100 Case – Precision Design and Craftsmanship
Mickael Boitte modeled this structure. He used powerful Blender software. His goal was authentic vintage appeal. The design first appeared in 2019. Brussels Comic Con hosted its debut. It served a vintage press reporter cosplay. This shell makes any camera look old. It captures the charm of history. Now you can recreate this iconic look. Embrace history with a modern twist.
Your DIY Transformation Kit
The Nikon D3100 body provides the base. Its internal components fit perfectly. This meticulous modeling ensures a snug fit. Mickael Boitte worked with great care. He ensured every curve was accurate. Every detail enhances the illusion. This project offers a fantastic opportunity. You can customize your gear. Craft a unique photographic tool.
- Authentic vintage aesthetics.
- Perfect fit for Nikon D3100 internals.
- Modeled using professional Blender software.
- Transforms a modern camera instantly.
Join the Retro Revolution
This project empowers your creativity. You gain a unique camera. Stand out from the crowd. Showcase your personal style. Create a conversation piece. People will notice your camera. It is a fantastic DIY venture. You build something special. Share your passion for photography. Celebrate classic design principles. Enjoy the building process.
Revive your classic camera. Fuse old and new technology. This project offers a unique fusion. It celebrates photographic heritage. Embrace the charm of yesteryear. Modern functionality meets vintage form. Start your custom build today. Experience a truly unique camera. Make a statement with every shot. Capture moments with style. Your D3100 becomes a masterpiece.
Technical Specifications & Additional Details
For more advanced details, you can explore related concepts directly on Wikipedia. Feel free to check out our main collection. Additionally, you might be interested in checking out our highly recommended Community Grenade.
You must log in and be a buyer of this download to submit a review.
| ABOUT THE SELLER |
|
| SELLER-USER-NAME | Mickael Boitte |
| 3D Model formats | FBX, OBJ, BLENDER, TEXTURES, Materials |
| 3D Model details | Textures, Materials, Scale transformations |
| Triangles | 201.4k |
| Vertices | 101k |
| Category | Electronics & Gadgets |
| Tags | 3D printed Nikon D3100 case, 3D printing projects, 3d-printing, blender, blender-3d-model, camera cosplay, camera mod, cosplay prop, Creality Ender 3, custom camera body, DIY camera, DIY camera case, Nikon D3100, Nikon D3100 mod, retro-camera, vintage camera, vintage camera shell |